
Introduction
You may have installed Windows on a partition that happens to be a little too small over time. For me, I chose to install Windows 7 on a 60 GB partition. Big mistake. While this wasn’t a problem at the beginning, it became one after a year passed, especially after the latest service pack was installed (SP1). I had less than 10 GB of free space remaining on my system partition even being careful with disk usage, and I decided that it was not enough. I now have 21 GB of free space.
So what are those 50 on 60 GB used for? Is it possible to delete some files to free up some space? That’s what this article is all about.
We will start from the safer tips that everybody can do without worrying about any problems, and some more manual ways if you still want more space, finishing by some risky tips that I don’t recommend to follow. This article is of course not the ultimate reference as we are not affiliated with Microsoft in any way and we do not know all the secrets of Windows, but it’s a good start for recovering some precious GB of free space.
Note
The screenshots are in French language because I am French. So my Windows is French.
1. Empty the trash
It may sound stupid, but that is the first step to recover some space!
2. Use the Disk Cleanup Utility
Each new version of Windows comes with the Disk Cleanup Utility. You can find it in the start menu in “Accessories>System tools” or by typing “cleanmgr.exe” in any command prompt. This tool is a good start to regain some free space. Here’s what you can do with this tool:
- Delete the “downloaded program files” folder content
- Delete the temporary Internet files
- Empty the trash-bin
- Delete the temporary files
- Delete the thumbnails
- Delete the unused or old System Restore points
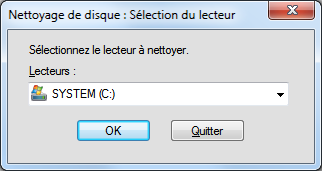
This is the welcome screen of the utility. You can select a disk to clean. The system disk is usually C:
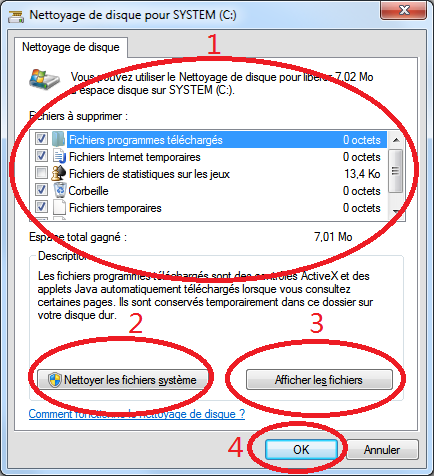
Using this tool is quite simple and safe. Just select what you want to delete, then click “Ok”. You can click on “Display files” to display the files to be deleted in an Explorer window.
Note that by default if will check the option to empty your Downloads folder. If you want to keep your downloaded files, uncheck that option.
Regarding the last part (deleting the unused or old System Restore points), it is only accessible if you run the tool as an administrator, or if you click the button “Clean system files” which has a small shield on it. You will be prompted to select the disk once again, then a new tab will appear (“Other options”)
- Choose what you want to delete
- Run as administrator
- Display the files
- Actually delete the files
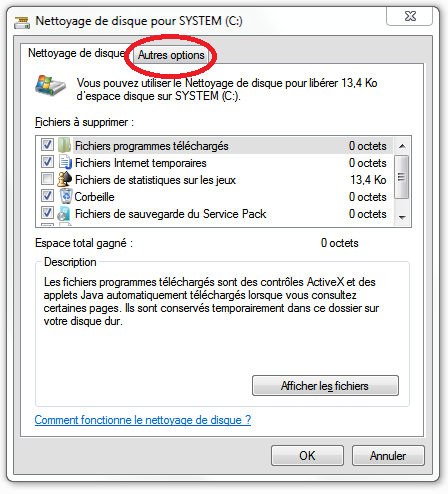
The “Other options” tab
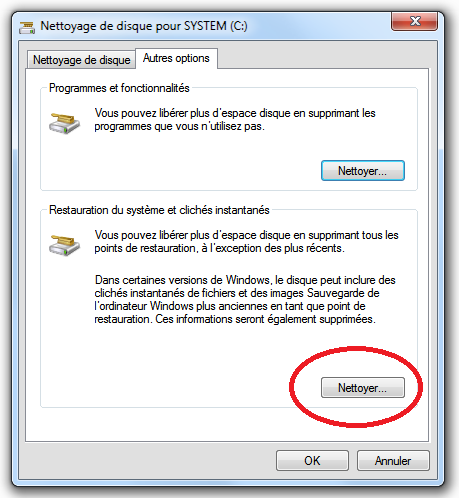
Delete the old System Restore points
As you can see, it’s pretty simple. Using this tool, you can recover a few GB of free space, especially if you never used it before. I personally advise to run it once every months. But how about recovering some more free space?
3. Take good habits with applications and games
3.1 Uninstall unused programs
You probably have a bunch of old and unused applications installed in your system. Let’s uninstall them ! You can find the Windows tool to manage installed applications in the Control Panel (“Programs”) or by typing “appwiz.cpl” in a command prompt. Don’t keep the applications you never use or use once a year. It slows down your computer and can take a lot of space. You can always download the latest version of the application you use once a year and install it again the next time you need it.
3.2. Install your applications elsewhere
While it is easy to just click on Next, next, next when installing an application or a game, it always default to the system partition, filling it rapidly. I advice you create a folder named Apps in another partition and that you install all your applications and games inside. For example: “E:\Apps”, “E:\Games” and so on. This will also clarify what belongs to Windows and Microsoft (in C:\Program files), and what belongs to you (in your custom folder).
4. Move the unnecessary files to another disk or partition
This looks so evident, but if you are the programmer type, you probably have several folders in your system partition that have no link with the system itself (such as a “C:\Projects” or “C:\Photos” directory for example). It is strongly advised to not place any file of importance in the system partition in order to protect your data in case of system re-installation and also to keep the system partition clean.
5. Move your documents to another disk or partition
By default, Windows places your Documents folder in the system partition. It would be nice to move it to another place ! You can do that.

- Create a new directory somewhere else (“E:\Documents” for example)
- Open an Explorer Window
- Inside the list on the left part of the window, locate the “My documents” entry (if you have more than one entry named “My documents”, choose the one that contain your files)
- Right-click on it and choose “Properties”
- Click on the “Location” tab (could be translated differently…)
- Click on the “Move” button
- Repeat the operation with “My music”, “My pictures”, “My videos”…
6. Advanced cleaning
I will now explain how to free a few more gigabytes. As I don’t consider it safe to do by everyone, only experienced users should follow these steps. If your system become unstable or unusable, you understand that you are the only responsible.
6.1 Delete the backup files after a Service Pack installation
By default, when you install updates, Windows keeps a copy of the original files along with the newer files. However, the Windows directory will quickly become more than 20 GB large. There is no longer a Dllcache folder, everything is now located in the WinSxS folder. This folder contains hard links to copies of different versions of hundreds of libraries. If you don’t plan to uninstall your Service Pack, you can make it become permanent and delete the original backup files. Note : you can do the same with Windows Vista SP2 and Windows Server 2008 by using the “compcln.exe” tool.
Warning: By doing this, you understand that you cannot uninstall the Service Packs and Windows upgrades anymore !
You can just run the following command in an elevated command prompt:
dism /Online /Cleanup-Image /ScanHealth
If your Windows image is not damaged, then you can run:
sfc /scannow
On the contrary, if it says it can be repaired, do the following instead:
dism /Online /Cleanup-Image /CheckHealth
dism /Online /Cleanup-Image /RestoreHealth
sfc /scannow
In any case, then you can proceed to reduce the space taken by updates and components (it can take from a few minutes up to a few hours depending on your system):
dism /Online /Cleanup-Image /spsuperseded
dism /Online /Cleanup-Image /StartComponentCleanup
dism /Online /Cleanup-Image /StartComponentCleanup /ResetBase
Then wait (it could take a while). I personally freed about 10 GB of space using these commands. Plus, you will have a much healthier system, almost like a fresh installation!
6.2 Clear the cache of every browser installed in your system
- The web browsers usually store a lot of informations in their cache. If you are a web developer, this can become problematic as you may use several web browsers. So simply follow the procedure for each browser to clean their cache. You should be able to recover from a few hundreds MB to even more.
- Don’t forget to clean Internet Explorer’s cache, it can be done in the Internet Options window. You can also delete safely the content of this folder: “C:\Users\_Your_username_\AppData\Local\Microsoft\Windows\Temporary Internet Files\Content.IE5”. Do not delete the Content.IE5 folder, only its content!
- Note that in Windows 10, you can instead delete the content of the this folder: “C:\Users\_Your_userneme_\AppData\Local\Microsoft\Windows\INetCache\IE”
6.3 Chrome or Chromium : Delete the old folders
If you installed Google Chrome or Chromium web browser, it keeps adding its new version in a new folder, and do not delete the old directories. This is problematic as it can take several hundreds MB after a few updates. In “C:\Users\_Your_username_\AppData\Local\Google\Chrome\Application” or “C:\Users\_Your_username_\AppData\Local\Chromium\Application”, if you see several folders with version numbers for name, you can safely delete the folders of the old versions of Chrome or Chromium. For example I kept the folders “‘78.0.3904.70”, and deleted all the other folders.
6.4 Windows Media Player & Media Center databases and thumbnails
If you use Windows Media Player or Media Center, it builds various databases and store the thumbnails of each album you play. This can take some few hundreds MB if you have a big collection of music. You can delete safely all the .wmdb files located in “C:\Users\_Your_username_\AppData\Local\Microsoft\Media Player” and also the files stored in “C:\Users\_Your_username_\AppData\Local\Microsoft\Media Player\Image cache”.
6.5 Delete the Speech recognition samples and data if you don’t use it
Like most people, you probably tried to control your computer using the integrated Speech Recognition and recorded hundreds of sample to train the recognition engine, then you eventually gave up and decided that you prefer to use the keyboard and mouse. But the samples and data are still there! You can delete the content of the following folders: “C:\Users\_Your_username_\AppData\Local\Microsoft\Speech\Files\MSASR” and “C:\Users\_Your_username_\AppData\Local\Microsoft\Speech\Files\TrainingAudio”. You should be able to recover from tens to hundreds of MB depending how thoroughly you trained the Speech Recognition engine.
6.6 Delete the thumbnails cache
If you often browser some photos, their thumbnails are stored in various databases for further use. You can safely delete any .db file located inside “C:\Users\_Your_username_\AppData\Local\Microsoft\Windows\Explorer”.
6.7 Delete the temporary files for CD burning
Windows has a special folder where it stores any file that we choose to burn into a CD (using the Windows utility). If you use this feature, there is probably some few files to delete inside the folder “C:\Users\_Your_username_\AppData\Local\Microsoft\Windows\Burn\”.
6.8 Delete the original images that you modified in Windows Photo Gallery and Live Photo Gallery
(This does not apply to Windows 10+)
If you modified some photos in one of those programs (even rotating a photo), a copy of the original file is stored in “C:\Users\_Your_username_\AppData\Local\Microsoft\Windows Photo Gallery\Original Images”. If you use those programs a lot, chances are good that you can recover from a few MB to several GB.
6.9 Delete the content of the Temp folder
Close any running applications, then go to “C:\Users\_Your_username_\AppData\Local\Temp” and delete everything you may find inside. Remember to empty the trash after. You can get back a few hundred MBs!
6.10 Compact Thunderbird folders
If you use this email client and you have a lot of emails, its profile folder will quickly take a few hundreds MB to few GB. So open Thunderbird, select a folder, then click on “File>Compact folder”. Repeat for each folder. This process can take some time. You should notice that hundreds of MB have been freed if you are lucky. It will re-index the Thunderbird email database and so it will take less space. I advice you do this every month. Thunderbird usually stores its data in a path similar to: “C:\Users\_Your_Username_\AppData\Roaming\Thunderbird\Profiles\u7n8j42k.default”.
6.11 Delete Google Earth’s cache
If you use this program, it will store several GB of data in its cache. Search Google for how to delete this cache.
6.12 Keep the latest Java version only
Java keeps installing new versions but often “forget” to uninstall obsolete ones. I personally advise to delete any Java version, then to reinstall the latest version. You should be able to save a few hundreds MB. Check also this folder for any old version of the Java installer and delete the old folders: “C:\Users\_Your username_\AppData\LocalLow\Sun\Java”.
6.13 Delete unused and old drivers in the Driver Store
Windows keeps a copy of every driver you install in a place called the Driver Store. It is located in “C:\Windows\System32\DriverStore\FileRepository”. Even if you uninstall a driver, it may still be in this store, and eventually this directory will weight a few GB. You should not (and you probably can’t) delete any file from the Driver Store manually. Instead, proceed as following:
- Open an elevated command prompt
- We need to get a list of all third party drivers. Type the following command (add the /all switch to get the drivers shipped with Windows also):
dism /online /get-drivers /format:table > drivers.txt
- Open the file drivers.txt and if you find some orphaned or duplicate drivers, note the corresponding oemxxx.inf files where xxx is a number. Ensure to keep at least the latest version of the driver if you still use the related device. I advise to use an editor like Sublime Text to sort the columns and lines of the file by driver name and version.
- For each driver to delete, type the following command to really delete the driver (replace xxx by the relevant number):
pnputil -f -d oemxxx.inf
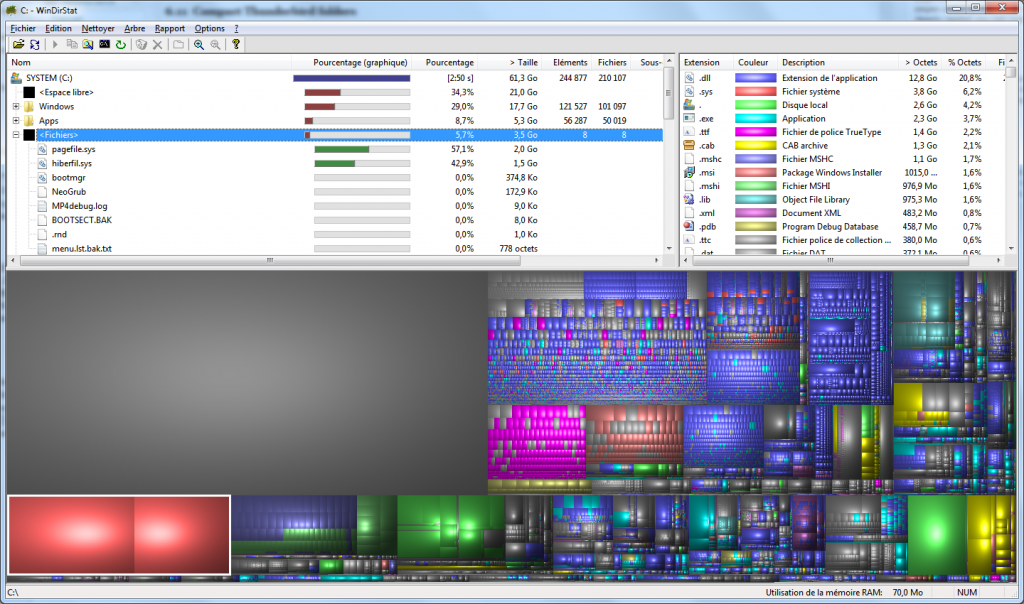
6.14 Use WinDirStat to locate big files and folders
WinDirStat is a vital software for anyone who mind about disk usage. It will give you a lot of useful informations and help you to locate some big files you may have forgotten. It will display graphically the usage of your disk once it finished to compute some statistical data (it can take some few minutes). Screenshot below:
6.15 Disable system hibernation
If you don’t use Hibernation but it is enabled, you can recover a few gigabytes. The file C:\hyberfil.sys is usually pretty huge (about 75% of the total amount of RAM) so no need to keep that kind of file, especially if you got a lot of RAM. To delete this file, simply disable hibernation in the Advanced Power Settings in the Control Panel or by typing this command:
powercfg -h off
7. Not recommended at all
This part is for users who know what they are doing and are desperate to recover some free space. I personally don’t do it. I repeat. Don’t do it unless you know what you are doing! You could end up having a broken Windows installation!
7.1 Delete the MSI cache
Each time you install an application who use the MSI installer, it stores a copy of the .msi file for further use (modification, repair, uninstallation…). This can take a lot of space. You can delete the .msi files inside the “C:\Windows\Installer” directory. But you will not be able to uninstall or repair any application who used one of those .msi files. You have been warned.
7.2 Delete the content of the “C:\Content.MSO” directory
It contains the installation files for Microsoft Office. Again, don’t do it if you don’t know what you are doing. Reclaiming a few GBs by not being able to update or repair Office is probably not a good idea.
7.3 Delete and recreate the NTFS USN journal
There’s a special file in each NTFS 5 partition called “C:\$extend\$UsnJrnl”. You can’t see it unless you use special tools, for example the excellent defragmentation tool Defraggler by Piriform. This file is a database of every single operation made in the file system. For example if you rename a file, a record is added to this file. If you install an application with 1000 files inside, there will be 1000 more records in this file. After a year, mine grown to more than 3.5 GB. After some research, it appears that you can delete and recreate this file. I did not find any drawback in doing this, but it’s probably risky to do it. If you want to try it, here is how (source: http://support.microsoft.com/kb/311724/en-us):
- Backup any important file located on the system partition (C:)
- Open an elevated command prompt
- Enter the following commands:
cd c:\
fsutil usn deletejournal /D C:
chkdsk /f
This will have for effect to delete the USN journal of C: and recreate it. You may have to restart to successfully recreate the journal.
7.4 Delete the content of the WinSxS directory
I personally strongly advise that you don’t do the following. Deleting the content of the C:\Windows\WinSxS will delete a lot of DLL files and even if Windows will regenerate this folder, you will probably leave your system in an instable state, and chances are that you can’t start most of your applications anymore. I prefer to not mess with this directory myself and let Microsoft tools do it (see the DISM tool and Disk Cleanup Utility discussed previously).
7.5 Delete all the System Restore points
With the Disk Cleanup Utility, you have an option to delete all but the newest System Restore points. But if you find your system stable enough, you can also delete all the System Restore points, and even disable System Restore. To delete the System Restore points, do as follow:
First, open the computer system properties (WIN + PAUSE or right-click on Computer and choose Properties, then click on the Advanced System Parameters link). Then follow these steps:
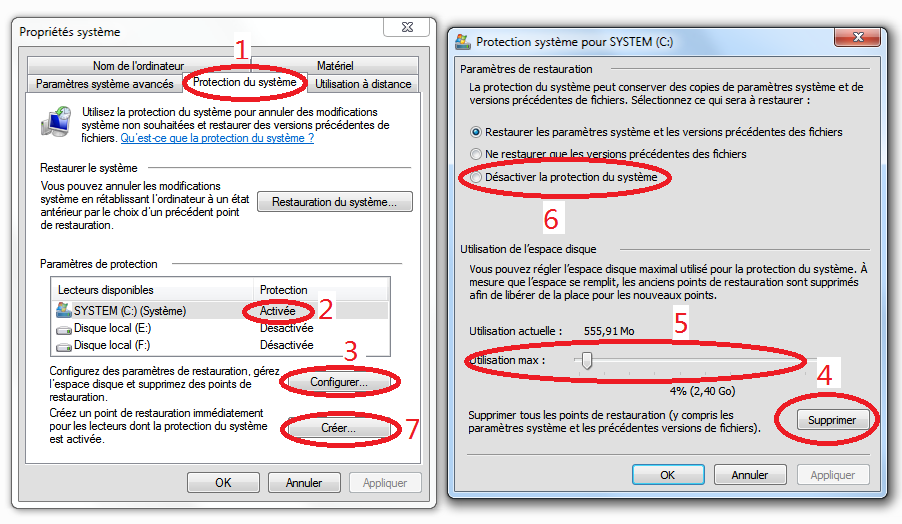
- Go to the System Restore tab
- Select the system partition in the list
- Click on the Configure button
- Click on the Delete button
- You can change the maximum total size that System Restore points can take using the slider.
- If you want to disable System Restore, choose this option among the 3 radio buttons (not recommended).
- Create a new System Restore point by clicking Create on the previous window (the System Restore tab) for security
Conclusion
That’s it for this article, hopefully you should have successfully recovered at least a few GB on your system partition, maybe even tens of GB!
If you have any comments or suggestions, or find a mistake in this article, do not hesitate to tell me and I will update it accordingly.

Hello,
A very good and instructive article. Many thanks.
You’re welcome 🙂
Thanks for the info 🙂
Very useful and helpful, thanks 😀
Finally, it is officially possible to remove Windows Update Backups, thus, cleaning up the WinSxS folder:
http://support.microsoft.com/kb/2852386
Hi. Thanks for a great article. One of the better-written ones out there. Appreciate the effort. Ta.
Very informative and useful..thank you very much 🙂
wow… thanks a lot.A Great Article.
After your tutorial … I cleaned like … 30 Gb!!!! This is a must read pare … definetly to my favs! Really helpfull
I’m glad I could help you recover so much space! Enjoy your extra free space now 🙂
Thank a lot, bro.
I just reclaim ~4Gb thank to you 🙂
Merci pour cette excellente synthèse ! J’utilise également CCleaner de piriform qui fait une partie du nettoyage indiqué. Je cherche actuellement une façon de détruire certains composants de windows qui sont référencés dans le cache WinSxS, et qui sont restaurés par la protection Windows dès qu’on effectue une vérification d’intégrité avec sfc.
if you have upgraded your windows or reinstalled it. Make sure to delete the old windows version. Which is in the root of C. C:\windows.old
There could be around 20GB to free up from there 🙂
That’s true for pre-Windows 10 versions, but if you use Windows 10 it will be deleted itself 30 days after the upgrade.
Trying to delete all instances of AVG as the expired version is wreaking havoc
causing shutdowns. Went into admin cmd prompt to delete file store entries.
typed dism /online /get-drivers /format:table > drivers.txt
got only returned cmd prompt > what am I doing wrong?
Duplicate file are really disturbing. Just use “DuplicateFilesDeleter program”
Sometimes we get an error when we try to delete a File or a folder for no reason , but of course there is a reason.We have many damage file or blocked files.Do not worry if we want to remove the error files or too long path files from our system,here I suggest a smooth way.So use “Long path tool” software and keep yourself.
I must say it was hard to find your site in google.
You write great posts but you should rank your website higher in search engines.
If you don’t know how to do it search on youtube: how to rank a
website Marcel’s way
I would suggest to try “Long Path tool” program.